

Comprehensive Guide to the Operation of Shandong Tile Adhesive: Professional Recommendations from Manufacturers
When conducting tile laying work in Shandong, the standardized operation of tile adhesive is a key link to ensure construction quality and the stability of tile laying. Combining the local construction environment and material characteristics, tile adhesive manufacturers have put forward a series of core precautions for the operation of Shandong tile adhesive. Each step directly affects the final laying effect and must be strictly followed by construction personnel.
1. Base Treatment: Lay a Solid Foundation for Laying
The base serves as the "foundation" for tile laying, and the quality of its treatment directly determines the bonding strength of the tile adhesive. Firstly, it is necessary to thoroughly remove impurities such as dust, oil stains, and floating mortar from the surface of the base. These substances will act as a "separating layer" to prevent the effective combination of the tile adhesive and the base, and in severe cases, may lead to hollowing and falling off of the tiles later. If there are oil stains on the base, professional cleaning agents can be used to wipe it clean and dry it; for dust, it is recommended to thoroughly clean it with a high-pressure hair dryer or a brush.
Secondly, the construction wall needs to be wetted in advance, but care should be taken to avoid water accumulation. A wetted base can better integrate with the tile adhesive, preventing the base from quickly absorbing the moisture in the tile adhesive due to excessive dryness, which would cause the tile adhesive to cure prematurely and reduce its bonding performance. At the same time, the surface of the base must be kept flat. If there are uneven or rough parts, cement mortar should be used for leveling and repair. During the leveling process, the proportion of cement mortar should be well controlled to ensure that the strength of the leveling layer meets the standards, and the subsequent tile laying work can be carried out only after the leveling layer is completely dry.
2. Scientific Bonding: Ensure Firm Laying
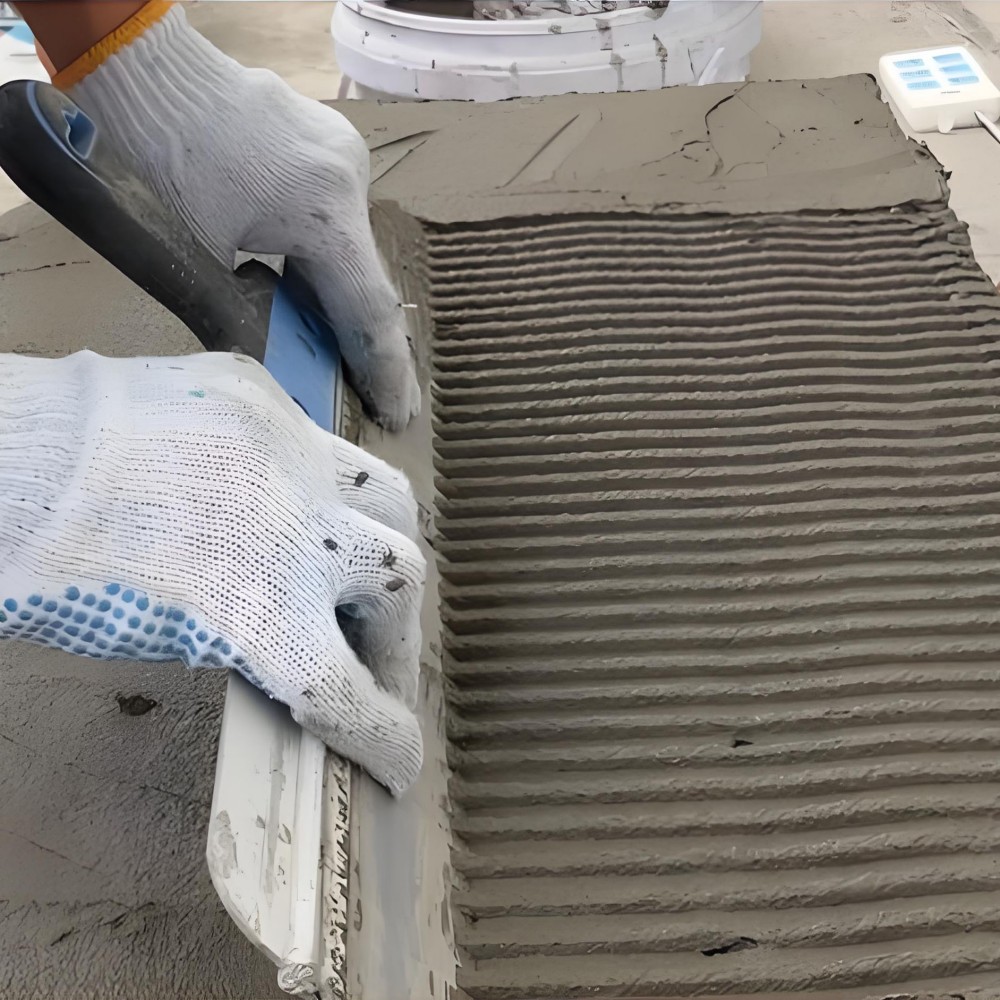
The bonding link is the core step of tile laying, and the appropriate operation method should be selected according to the type and size of the tiles. Firstly, use a notched trowel to evenly scrape and apply the tile adhesive on the working surface. The thickness of the application should be flexibly adjusted according to the characteristics of the tile material. Generally speaking, due to the large size and heavy weight of marble tiles, to ensure firm bonding, the scraping thickness should be controlled between 4 and 6 mm; while ordinary wall tiles are relatively small in size, and a scraping thickness of 3 to 4 mm is sufficient to meet the bonding requirements. When scraping with a notched trowel, it is necessary to keep the trowel at a certain angle with the working surface to ensure that the tile adhesive forms uniform notched stripes. This stripe structure can effectively expel air, increase the contact area between the tiles and the tile adhesive, and improve the bonding effect.
If the grooves on the back of the tiles are deep (such as some antique tiles and full-body tiles), simply scraping the tile adhesive on the working surface may not fully fill the grooves, resulting in poor bonding between the tiles and the tile adhesive. In this case, in addition to the normal scraping of the tile adhesive on the working surface, it is also necessary to perform plastering treatment on the back of the tiles, and evenly apply the tile adhesive into the grooves on the back of the tiles to ensure that the grooves are completely filled with the tile adhesive. In addition, the traditional "back-coating method" can also be adopted: apply the tile adhesive directly on the back of the tiles, then align the tiles with the laying position and press them gently to make the tile adhesive fully fit with the base. Finally, tap the surface of the tiles lightly with a rubber hammer to ensure the tiles are flat, and scrape off the excess tile adhesive that overflows to keep the construction surface clean.
3. Timely Adjustment: Ensure Laying Accuracy
After the tiles are laid, they are not fixed immediately, and there is a period of "adjustment time". During this period (usually 10 to 20 minutes after tile laying, the specific time depends on the type of tile adhesive and the ambient temperature), construction personnel can fine-tune the position and flatness of the tiles. If it is found that the tiles are offset, have height differences, or have uneven gaps, the tiles can be gently pried up, adjusted to the correct position, and then pressed and fixed again. During the adjustment process, the movements should be gentle to avoid excessive force causing deformation of the tile adhesive or damage to the tiles. Using tools such as a level and a straightedge to assist in adjustment can more accurately control the flatness and verticality of the tiles, ensuring that the overall laying effect is beautiful and neat.
4. Preparation of Composite Materials: Control the Quality of Adhesive
The preparation of tile adhesive is a key preliminary step affecting its performance, and it must be operated in strict accordance with the standard process. Firstly, prepare sufficient dry tile adhesive powder, ensuring that the tile adhesive is not damp or caked. Damp or caked tile adhesive will seriously affect the bonding performance and cannot be used. Then, add clean water according to about 25% of the weight of the tile adhesive. It is particularly important to note that clean water should be added to the mixing container first, and then the tile adhesive powder should be poured in. This sequence of "water first, then powder" can avoid caking of the powder and ensure uniform mixing.
When mixing, manual mixing or an electric mixer can be selected according to the amount used. Manual mixing is suitable for small-batch preparation, and a mixing rod should be used for thorough mixing to ensure that the tile adhesive powder and water are completely integrated without dry powder particles. An electric mixer is more efficient and mixes more evenly, which is suitable for large-batch preparation. When mixing, the mixing speed should be well controlled to avoid excessive bubbles in the tile adhesive due to too high speed. After uniform mixing, the tile adhesive needs to stand for 5 minutes. This process is called "curing", which allows the polymer in the tile adhesive to fully dissolve, improving the viscosity and bonding strength of the colloid. After curing, according to the consistency required for construction, a small amount of clean water can be appropriately added for mixing again, adjusting it to a state that is easy to scrape and does not sag.
5. Post-Construction Maintenance: Ensure Curing Effect
After the tile laying is completed and adjusted, it enters the post-construction maintenance stage. The tile adhesive needs to solidify slowly in a natural environment, and external interference must be avoided during this process. Within 24 hours after construction, it is strictly forbidden to soak the laid surface with water, allow water to wash the laid surface, or let heavy objects roll over or hit the tile surface. Water soaking will disrupt the curing process of the tile adhesive, leading to a decrease in colloid strength and bonding failure; rolling or hitting by heavy objects may deform the tile adhesive that has not been fully cured, causing hollowing and cracking of the tiles.
During the maintenance period, attention should also be paid to maintaining good ventilation in the construction environment, and maintenance in an environment with high-temperature exposure, low-temperature freezing, or high humidity should be avoided. High-temperature exposure will cause the surface of the tile adhesive to lose water quickly, and the internal water cannot be replenished in time, leading to shrinkage cracks in the colloid; low-temperature freezing will cause the water in the tile adhesive to freeze, destroying the colloid structure, and the strength of the colloid will be greatly reduced after thawing; a high-humidity environment will prolong the curing time and increase the risk of external interference. Generally, it takes about 7 days for the tile adhesive to fully cure (the specific time depends on the ambient temperature and humidity), and subsequent operations such as joint filling and cleaning can be carried out only after full curing.
6. Usage Control: Avoid Material Waste and Quality Hazards
The amount of tile adhesive mixed at one time should be reasonably controlled according to the construction progress and the number of operators. In principle, the mixed tile adhesive should be used up within 1 hour. After mixing, the tile adhesive will gradually undergo a curing reaction. As time goes by, its fluidity and bonding performance will continue to decrease. After more than 1 hour, the tile adhesive may have begun to initially set. At this time, even if clean water is added for re-mixing, its original bonding performance cannot be restored. If it is continued to be used, the laying quality will be seriously affected, leading to problems such as hollowing and falling off of the tiles later.
During the construction process, the tile adhesive should be mixed in batches according to the actual laying speed to avoid material waste caused by mixing too much at one time. At the same time, for mortar that has dried and hardened (including tile adhesive that has not been used in time after mixing and solidified, and dried and solidified mortar scattered during construction), it is strictly forbidden to add water again for mixing and use. The internal structure of these dried and solidified mortars has changed, and their bonding strength is far from meeting the construction requirements. Using them will 埋下 serious hidden dangers for the quality of tile laying.


